In this blog post, we’ll describe how to run an API Builder Microservice in OpenShift, a comprehensive enterprise-grade application platform, built for containers with Kubernetes. This will be useful for test and development but not production. In future posts, we’ll look at autoscaling, load balancing, high availability and other production-grade aspects.
Pre-requisites
Before we begin, please make sure you have the following pre-requisites
* An OpenShift account (a 60 day free trial is available)
* OpenShift CLI installed on your machine
* A Docker account
* Docker installed and working on your machine
* A working API Builder Application Dockerized and pushed to Docker Hub
* Alternatively, you can use my API Builder MongoDB project on Docker Hub but you will need a MongoDB instance, such as on MongoDB Atlas (which has a free tier)
Once you have all of that, let’s get started.
Overview
Here is an overview of what we will do:
- Make sure the API Builder Project in Docker Hub works locally by making a local API call
- Create a new project in OpenShift
- Add our API Builder container by specifying the DockerHub name and any environment variables
- Expose the pod as a service and then expose the service so that it is externally accessible
- Test our API by making an API call to OpenShift
Prepare your API Builder Project
The instructions in this blog post will assume that you are using my API Builder MongoDB image that is in Docker Hub but you’ll need a MongoDB instance with a database, collection and data. You can use MongoDB Atlas as described in the pre-requisites. You’ll need your MondoDB connection URL.
READ MORE: Discover the role of APIs in microservices.
Publish API Builder Docker Image to Docker Hub
If you are using my Docker image from Docker Hub, then you can skip this part. If you created your own API Builder project, then follow the steps here to Dockerize your project and then follow the steps below to publish to Docker Hub.
- Tag your image
docker tag apibm lbrenman/apibmongodb:1.0.0
Note that my local docker image is called apibm and I want to publish to my Docker Hub account, lbrenman, with a version of 1.0.0 and a name of apibmongodb
- Publish Your Image
docker image push lbrenman/apibmongodb:1.0.0
Note that if you get an error trying to publish to Docker Hub, make sure you are logged in using ‘docker login’
- Make sure your image appears in the repository (and add the short and full description)
Test Docker Hub API Builder Project
It is best to remove the Docker image on your machine and make sure you can run your API Builder project directly from Docker Hub because this is what will happen in OpenShift.
For example, to run my apibmongodb API Builder Docker Image, use the following command (with your MongoDB connection URL):
docker run --rm --name apibm -p 80:8080 -e MONGO_URL="mongodb://admin:xxxxxx@192.168.1.38:27017/mydata?authSource=admin" lbrenman/apibmongodb:1.0.0
Note: replace with your API Builder Docker Image or if using mine, then replace the MONGO_URL value with the MongoDB connection URL for your MongoDB instance
Test the API from Curl
curl 'http://localhost/api/mongo/dog'
Note: replace the path to the API with the one appropriate for your project or MongoDB database
Create an OpenShift project
We are going to mainly use the OpenShift CLI to deploy API Builder to OpenShift.
- Using the OpenShift CLI, log in to OpenShift:
oc login https://console.starter-us-west-2.openshift.com
Note: replace URL with the appropriate one for your OpenShift account
- Create a new project
oc new-project myproject
Note that the OpenShift free tier allows for only one project at a time
Add the API Builder Application
We are going to create a template for creating our API Builder app (pod). Create a JSON file called apibm.json with the following contents:
{
  "kind": "Pod",
  "apiVersion": "v1",
  "metadata": {
    "name": "apibm",
    "creationTimestamp": null,
    "labels": {
      "name": "apibm"
    }
  },
  "spec": {
    "containers": [
      {
        "name": "apibm",
        "image": "docker.io/lbrenman/apibmongodb:1.0.1",
        "ports": [
          {
            "containerPort": 8080,
            "protocol": "TCP"
          }
        ],
        "env":[
          {
            "name": "MONGO_URL",
            "value": "mongodb://<username>:<password>@cluster0-shard-00-00-merks.mongodb.net:27017,cluster0-shard-00-01-merks.mongodb.net:27017,cluster0-shard-00-02-merks.mongodb.net:27017/<databasename>?ssl=true&replicaSet=Cluster0-shard-0&authSource=admin&retryWrites=true"
          }
        ],
        "resources": {},
        "terminationMessagePath": "/dev/termination-log",
        "imagePullPolicy": "IfNotPresent",
        "capabilities": {},
        "securityContext": {
          "capabilities": {},
          "privileged": false
        }
      }
    ],
    "restartPolicy": "Always",
    "dnsPolicy": "ClusterFirst",
    "serviceAccount": ""
  },
  "status": {}
}
Note: Use the MongoDB connection URL for your MongoDB instance
Note that I created this template based on hello-pod.json from https://github.com/openshift/origin/tree/master/examples/hello-openshift
- We’ll use the template above to create our API Builder Pod as follows:
oc create -f ./apibm.json
The response should be:
pod/apibm created
- Check the status of the API Builder pod as follows:
oc get pods
Initially, the response might be as follows:
NAME READY STATUS RESTARTS AGE
apibm 0/1 ContainerCreating 0 17s
Eventually, you should see the status as Running
NAME READY STATUS RESTARTS AGE
apibm 1/1 Running 0 1m
- Check the API Builder logs using:
oc logs apibm
The response should be:
1553169935590 configuration applied in this order: /app/conf/default.js,/app/conf/mongo.default.js
1553169936255 API Builder/Kobe (4.5.8) apibmongodb/1.0.0
1553169936255 APIKey is: 3wEwROK+ZEyt4pr5k9lA5NQE9te8dG7p
1553169936544 No APIKey or APIKeyAuthPlugin set in your config. Your server has no authentication strategy.
1553169936546 Registering upgrade handler for flow
1553169936552 waiting on server to finish loading
1553169937089 Registered plugin: @axway/api-builder-plugin-dc-mongo
...
1553169938528 binding api (get) /api/mongo/dog/distinct/:field [model] sort:-2
1553169938529 Access the swagger API documentation at http://localhost:8080/apidoc/swagger.json
1553169938531 server started!
1553169938531 server started on port 8080
Expose The Pod as a Service
- Use the following command to expose the pod as a service:
oc expose pod apibm --type=NodePort
The response should be:
service/apibm exposed
- Check the service using:
oc get services
The response should be:
NAME TYPE CLUSTER-IP EXTERNAL-IP PORT(S) AGE
apibm NodePort 172.30.30.13 8080:30719/TCP 31s
- Now let’s use a router to expose the service in order to get an externally accessible IP address:
oc expose svc/apibm
The response should be:
route.route.openshift.io/apibm exposed
Test Your API
- Go to the web console to get the external URL as shown below:
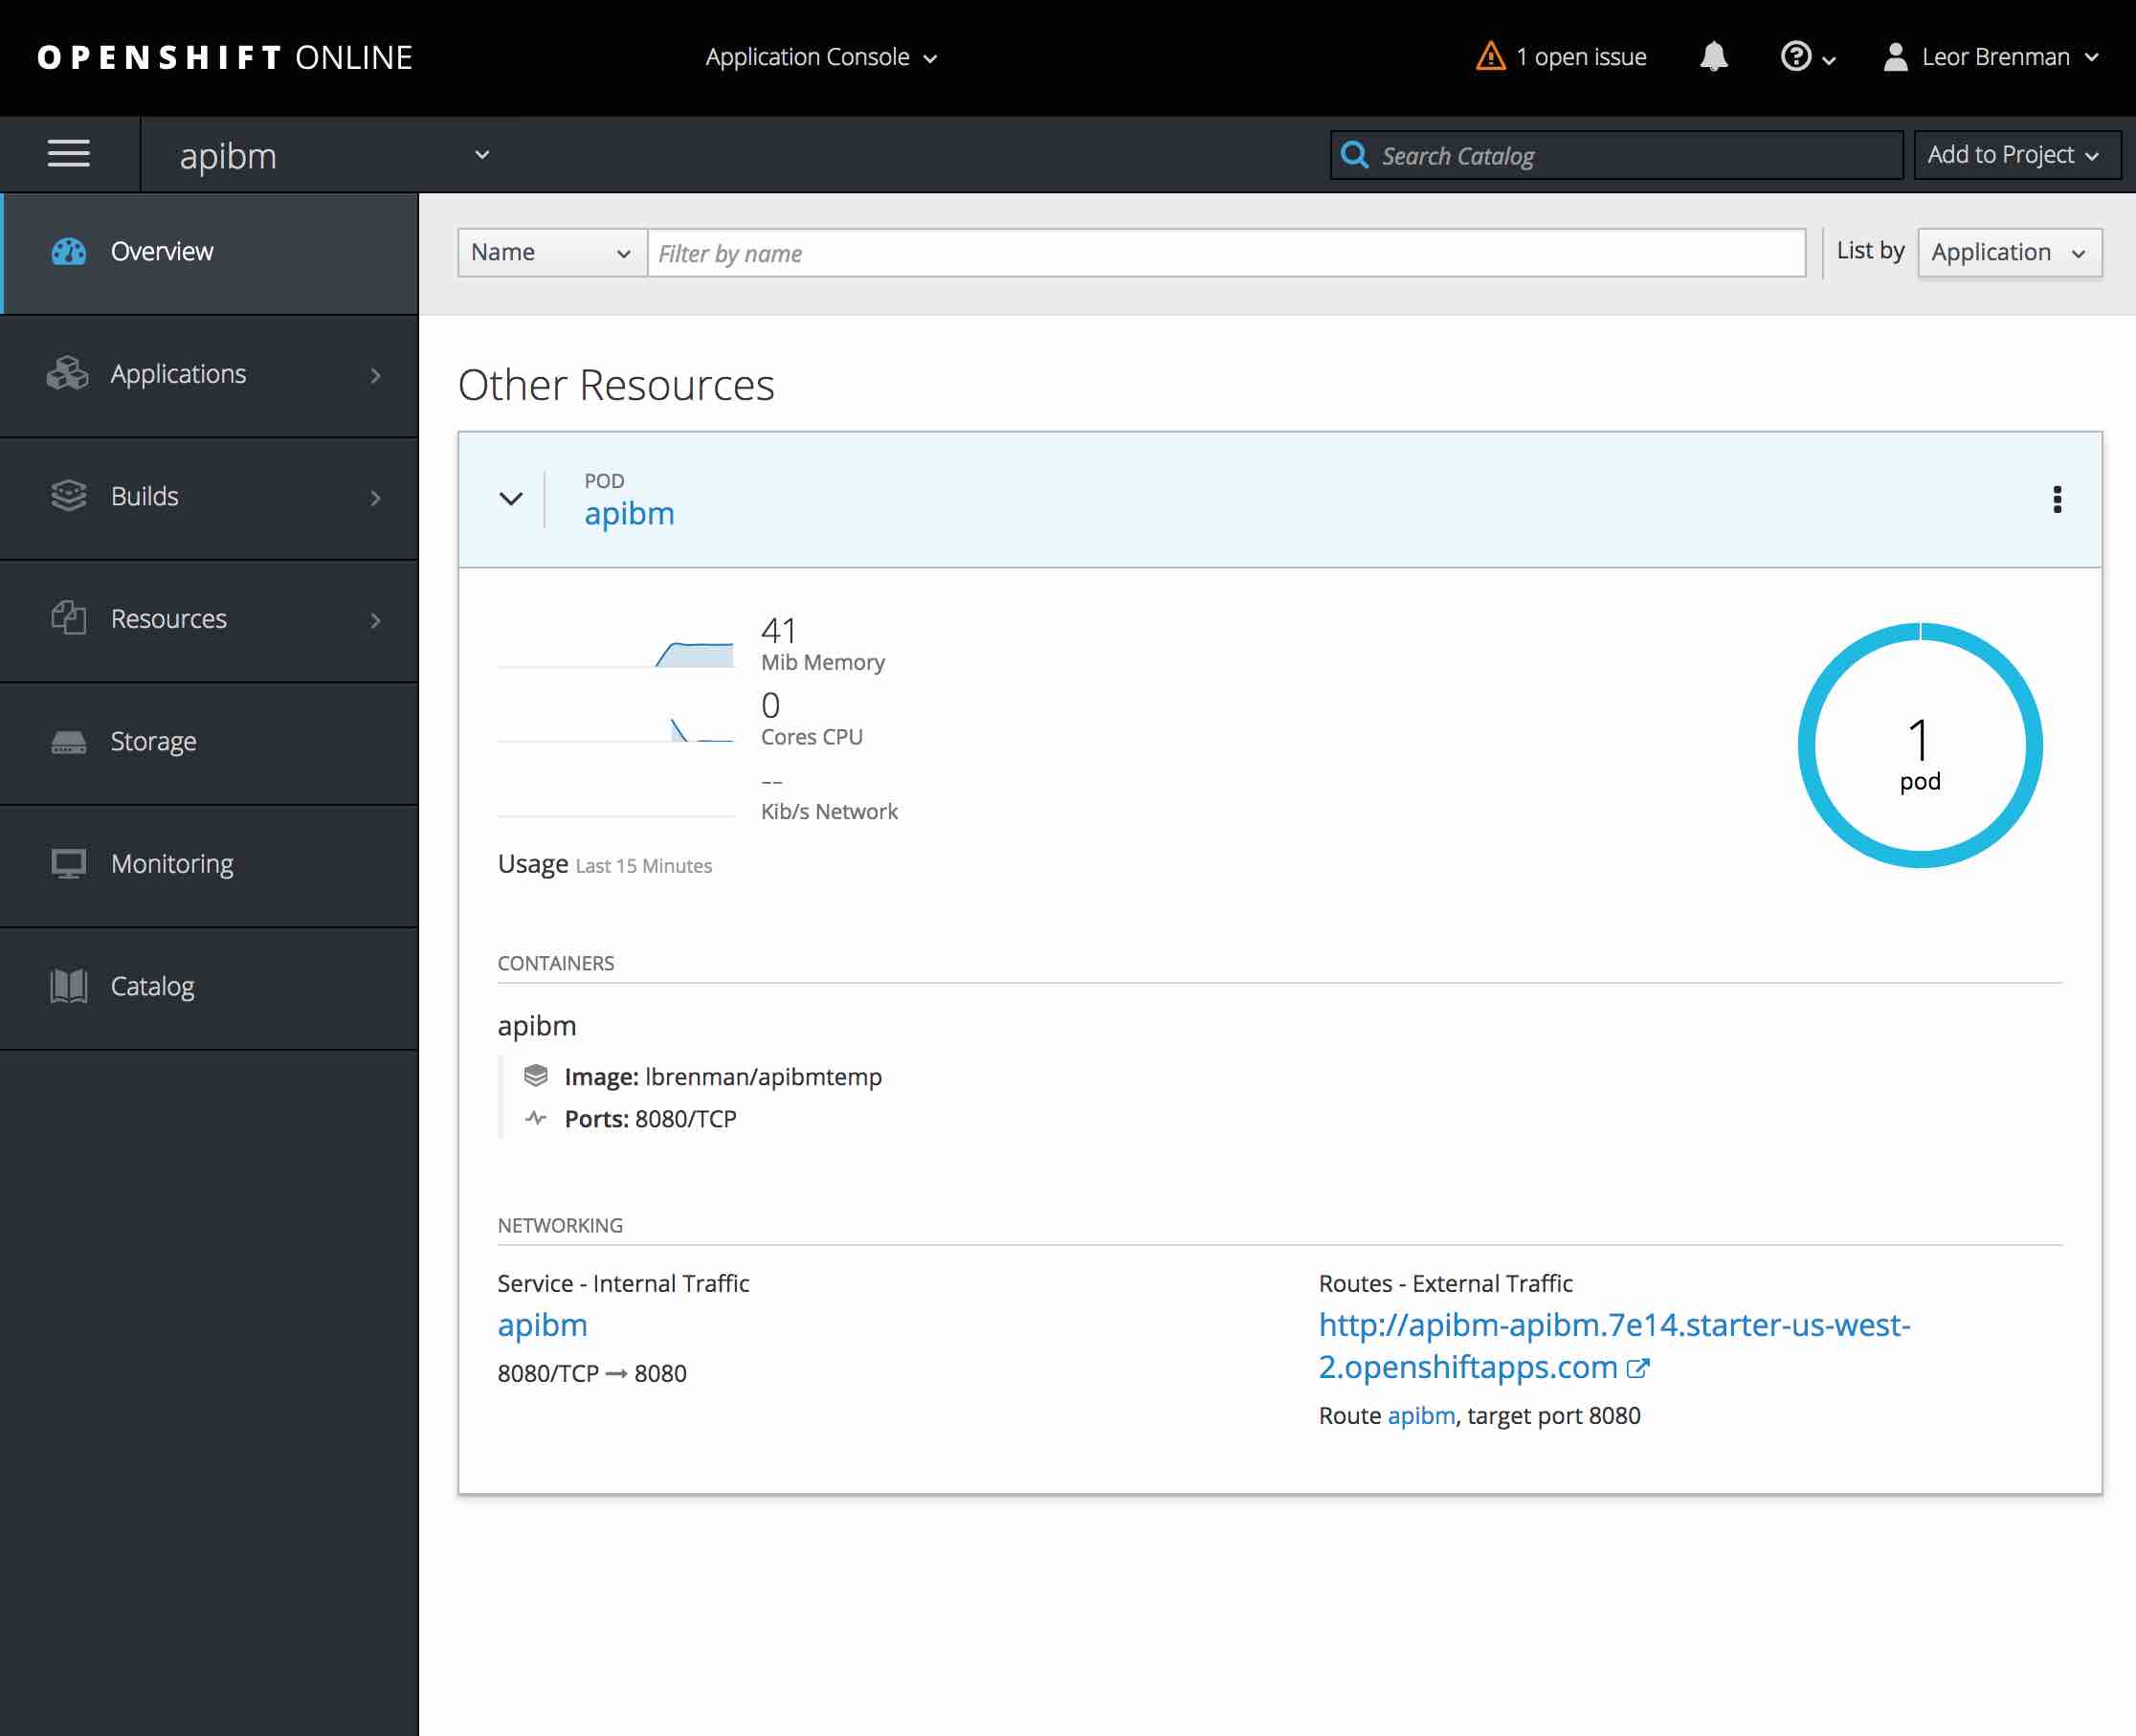
Note: My container’s external IP address is http://apibm-apibm.7e14.starter-us-west-2.openshiftapps.com/ from the screenshot above
Note: The console URL was provided to you when you signed up for your OpenShift account. My Console URL is: https://console.starter-us-west-2.openshift.com/console
- Test your API:
curl 'http://apibm-apibm.7e14.starter-us-west-2.openshiftapps.com/api/mongo/dog'
Summary
In this blog post, we saw how easy it is to run your API Builder microservice in OpenShift. In this first part, we did a simple deployment for test or development. In future posts, we’ll look at a more robust deployment that will be more suitable for production.
Discover more: Create an API Builder Multi-Container application using Kubernetes.
Follow us on social