
Are you like me and tired of doing anything with your hands? I mean that’s so 2015. Since the advent of Amazon’s Alexa (echo) in 2015, I’ve not touched a light switch, turned on a TV, or set the temperature in my house with my dirty hands. So why not extend that to other trivial tasks in my life, such as playing videos on my computer?
Here’s is a quick little demonstration on how to do such a trivial task.
For this exercise, I used a lot of common “off the shelf” technologies, so here’s what you’ll need.
- Of course you will need an Amazon Alexa developer account
- An Axway AMPLIFY Platform account to build out the APIs with API Builder (Start your free trial here!)
- Have Node.js installed
- Have socket.io installed
- Have Apache 2 (or some web server) installed
And, if you plan on hosting your web server locally, you’ll need: ngrok (if you plan on keeping this running for more than 24 hrs you will need a basic account)
Assumptions:
- You know basic HTML
- You understand basic APIs
- Understand what an Alexa skill is
- You have a basic knowledge of node.js
- You hate using your mouse and keyboard to hit the play button videos
Ok, let’s get started with Alexa!
Start on the Alexa side. To do this login into your Alexa developer portal and create a new skill. Give it a name (this is all done in a wizard, so don’t worry). Choose a model to add to your skill and choose custom.

Then, just go down the list and do what they tell you to do.
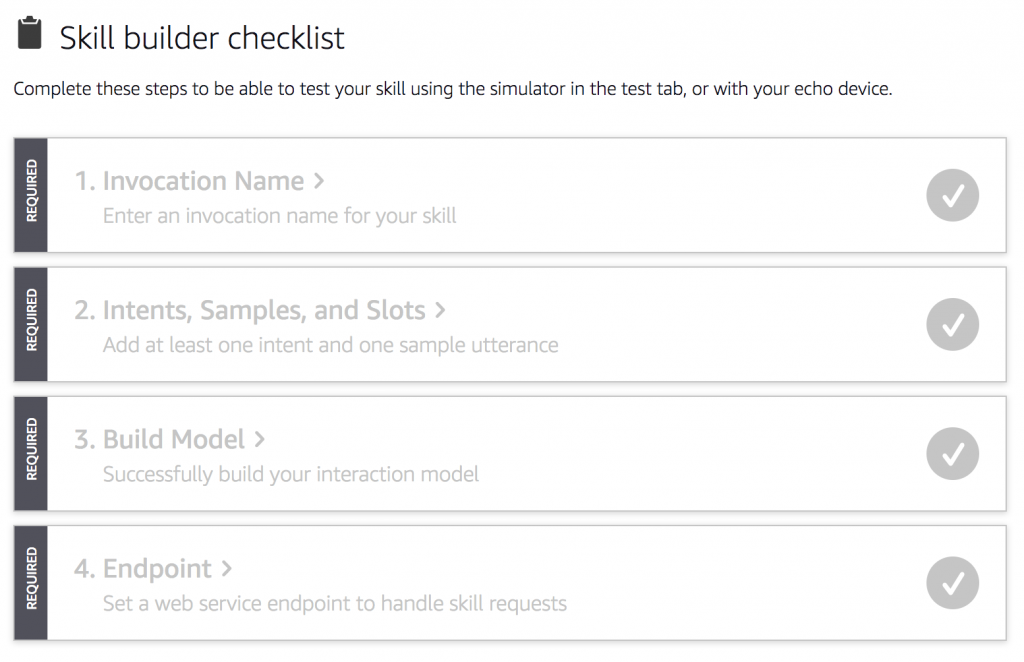
- Invocation Name (mine is Griffin demo as in “Alexa ask Griffin demo to play the video”)
- Intents
For your intents, you will need to create two intents. I called mine GriffinDemoPlayIntent and GriffinDemoStopIntent, but the name is really up to you, as long as you remember to use the same name in your intent switch statement. We will talk about that later. Then, add a few sample utterances and hit the + icon. I added “to play the video” as in “Alexa ask Griffin Demo to play the video”. Get it?

You will then need to set up your endpoints.

Make sure you choose HTTPS and paste in your endpoint URL, it will be something like: https://125145147879c1d23a9fa2.cloudapp-enterprise.appcelerator.com/api/alexaapphandler
Then, in the dropdown, choose the wildcard option.
NOTE: if you want to test on your local computer you will need to use ngrok and the url will be the ngrok url you create (Example ./ngrok http 8080). You need the port 8080, because that’s what API Builder will be running on.
Ok, that pretty much covers the Alexa part. There are a few things you can do such as build model add an icon for your skill, blah blah blah, but this isn’t an Alexa skill tutorial.
Next, let’s make some APIs with API Builder!
To start, find a good folder to keep all this code. If you haven’t done so already, you will need to install AMPLIFY API Builder. If you’ve already got that, GREAT! Let’s go!
Open a command prompt and run appc new and choose API Builder App.
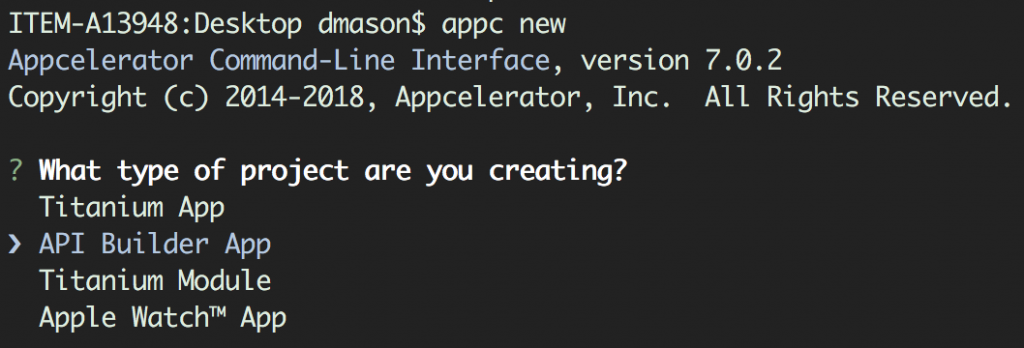
Then follow the instructions in the window.
Next, you will need to start the server. Drill down into the folder cd YOUR_FOLDER_NAME and type appc run. Your API Builder server should start up.
Now, let’s get a few APIs started. Before you start, take a look at this post that explains in more detail the Alexa API handler .js file we are going to talk about here. I’m not going to go that deep into it. So if you are interested, check it out.
NOTE: The API files will need to go into a folder called apis in the root of your project. There should be one there already with an example API in it called “testapi.js”
alexahandler.js
So, I’m going highlight a few of the main points of this first API. But here is the whole file, if you want to reference it.
This is where a lot of the magic happens.
You will notice I have case statements with the names of the intents I created in the Alexa developer portal: GriffinDemoStartIntent, GriffinDemoStopIntent. What happens here is the Alexa server gets the call, “to play the video”, it will then send the GriffinDemoStartIntent to this API, and here it gets intercepted and marshaled.
We have some utility functions that will handle our play and stop calls to the web site. Then, we can send back a message to Alexa to inform us that our video is indeed playing. (“Your video is playing.”)
/// ...at the top
var Utils = require('lib/utils');
// ... towards the bottom

switch (req.body.request.intent.name) {
 case "GriffinDemoStopIntent":
        Utils.sendStop("123alexa", function(e) {
            sendResponse(req, resp, next, e.msg, true, {});
        });
        break;
    case "GriffinDemoPlayIntent":
        //here I'm passing an ID in case I want to use this in the future.
        Utils.sendPlay("123alexa", function(e) {
            sendResponse(req, resp, next, e.msg, true, {});
        });
        break;

    case "AMAZON.HelpIntent":
        sendResponse(req, resp, next, "Hello Ask to play the video.", true, {});
        break;

    default:
        console.log("alexaapphandler: Invalid intent");
}
In our utils.js file, we have the function that will handle calling out to our server (emitting) the doPlay event.
exports.sendPlay = function(id, callback) {
        // tell the server to play
socket.emit('doPlay',{id : id});
callback({"msg":"Your video is playing."});
};
In order to get this all working with API Builder outside of your local environment, you will need to deploy your API Builder project using appc publish. This command will deploy the project to the cloud, so that you can access it from anywhere. You will want to make sure in your package.json file you have these two dependencies added: the socket.io and the alxea-verifier package.
"socket.io": "^2.1.0",
  "alexa-verifier": "^0.3.0"
Now let’s talk about our web server
Start by creating a basic web app (index.htm, player.js, css if you want one, etc).
In our index.htm, all we need to do is create a video tag sourced to your video, and links to two things: the socket.io.js file and the player.js file.
<!DOCTYPE html>
 <head>
 <title>Alexa Skill</title>
 <script src="https://mydomain.ngrok.io.ngrok.io/socket.io/socket.io.js"></script>
 <script src="js/player.js"></script>
 </head>
 <body>
 <video controls>
 <source src="assets/medicaldemo.mp4" type="video/mp4">
 </video>
 </body>
</html>
Next, let’s create the player.js file. This is the file that will be listening for calls over the socket and triggering the play and pause of the video.
var socket = io.connect("https://mydomain.ngrok.io.ngrok.io");

document.addEventListener("DOMContentLoaded", function(event) {
   var media = document.querySelector('video');

    socket.on("doPlayLocal", function (data) {
        media.play();
    });

    socket.on("doStopLocal", function (data) {
        media.pause();
    });
});
SPECIAL NOTE: You will need to disable the auth key in your conf/default.js file in order to allow Alexa to call the handlerapi. To do this, open the conf/default.js file and edit the entry APIKeyAuthType, setting it to none.APIKeyAuthType: 'none',
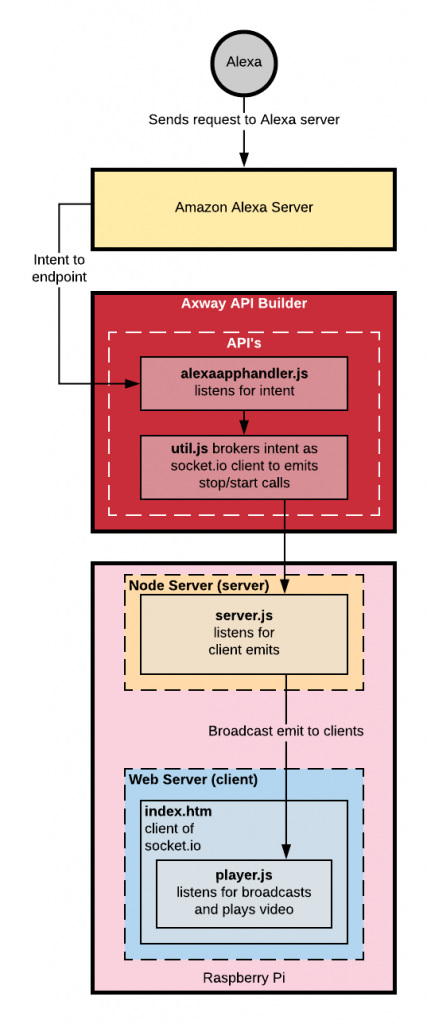
Here is a architecture overview:
Conclusion
Well, there you have it. A complex way to do a simple task. If you have any questions about this, please leave a comment and I’ll try to help.
Follow us on social