This blog entry is the final part of a three-part series where we will ultimately build a Cloud to Cloud (C2C) integration between Service Now and Slack, utilizing Event-Driven triggers to execute an automated orchestration Flow. Read part one and two of my series here.
In this blog entry, I will cover how to:
- Create an Event-Based Flow in Axway Integration Builder.
- Configure the Service Now Connector Instance Event Polling to trigger autonomous POSTing of new Incidents to Slack.
- Create a Flow Instance to successfully execute and monitor the steps configured in the Flow.
Create and Configure and Event-Based Flow
At this point, we have seen how the Service Now and Slack APIs work independently. Remember the ultimate goal is to put these together so a new Incident in Service Now will POST a message to your Slack Channel automatically.
- Login to the Axway Platform and navigate to the IB Sandbox. Navigate to the Flows tab on the left-hand side. Select “Build New Flow Template.”

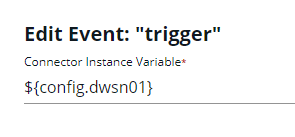
Build New Flow Template - Choose “Build a New Flow,” choose a unique name, and choose an Event Type Flow. This Event type Trigger will operate against the Events configured in an associated Connector Instance. We will set the variable up as part of the trigger creation and associate it later when we create a Flow Instance. This will ultimately look for and trigger off the Events we configured in the Event Polling section of the Service Now Connector Instance, which we set up in the first blog post to happen once per minute. Click the “ADD EVENT” button to get started.

- Choose a variable that will represent your Service Now Connector Instance. To do this, press the ‘+’ button twice, then choose Connector Instance. Give the variable a name (e.g. dwsn01). Select this variable from the list and save.
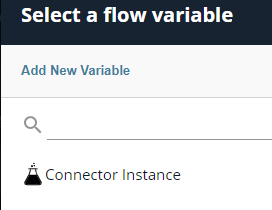
Select a flow variable 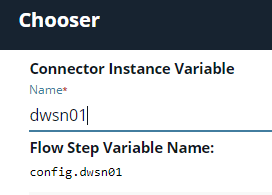

- This should bring you to the Flow Builder page. Choose to create a new Variable in the top right of the screen. Choose “Connector Instance.” Name this variable something that will represent your Slack Connector Instance (e.g. dwslack01). Save.


- Create a Value type Variable. This will represent your Slack channelID that we tested in the last blog. By making this a variable, we can easily update it when creating a new Flow Instance to easily tie into many Slack channels. At the end of this step, your Variables page should show two Connector Instance variables, which we will later link to the Connector Instances we configured in the first two blogs and a Value variable, which we will populate later.


- Press the Plus button in the Flow field to add your first step. Choose JS Script. Here we will set a message that will be used for the Slack body we POST via the /channels/{channelId}/messages API. This could be hardcoded there later, but this adds more ability to abstract the body for easy manipulation.

- Name the JS Script step. The name will be used in a variable name in the next step, so I suggest using something easy with no spaces (e.g. preparePostToSlack).
- Create a variable to represent the body and return it with JavaScript:
JS Script Contents |
| let body = {“text”: “New ServiceNow Incident Created”}; done({body:body}); |
- Check your JS Script filter looks similar to the screenshot below. If so, save and continue.

- Click on the JS Script filter you created and choose “On Success” to add the next step. Choose Connector API Request. Fill it out as follows:
- Name: WhateverYouWant (e.g. POSTtoSlack)
- Connector Instance Variable: Press plus and choose the slack variable you set earlier (e.g. swslack01).
- Method: POST
- API: /channels/${config.slackChannel}/messages. Replace the channelID with the id you captured in the last blog post when testing your Slack APIs.
- Choose “Show Advanced.” In the body field, refer to the body variable you set in the previous step. The name of the step will change based on what you called that step (e.g. ${steps.preparePostToSlack.body}).
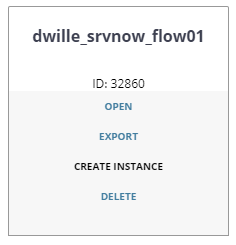
- Save this and navigate back to Flows by clicking on the Flows tab to the left. Find your new Flow. Hover over it and choose “Create Instance.”
- Configure the Flow Instance.
- Select the plus in the Service Now variable box. Select your Service Now Connector Instance we set up in the first blog post.
- Select the plus in the Slack variable box. Select your Slack Connector Instance we set up in the second blog post.
- Fill in the slackChannel variable in the Values box with your Slack ChannelID we found in the second blog post.
- Choose create Instance.

Demonstrate the Flow in action.
- Navigate to the Service Now Incidents Web GUI dialog. You can do this by logging in at servicenow.com, going to Manage à Instance, and selecting the URL. If your instance has been idle for a period, it may require you to “Wake Up” your instance to continue.
- Search for “Incidents” in the Navigation Filter. Select the link under Service Desk à Select “New” at the top to create a new Incident. Select a caller, give it a description, then click Submit at the bottom of the page. Remember, we set up the Service Now Connector Instance for Event Polling once per minute against the Incidents API, then set up an Event Trigger to execute Flow login when the Event Poller pulled a new Event. The desired outcome here is to see our Flow Instance execute the steps we configured within one minute of the new Incident creation, which will result in a message being POSTed to Slack.


- Navigate to your Flow Instance in Axway Integration Builder. This can be done by clicking on the “Flows” tab, searching for your Flow Template, then selecting the number on it to see your Flow Instances. Hover over it and select “Executions.” Recall we set the Event Poller to one minute. Refresh until you have seen the execution as “Pending” in yellow. A few seconds later refresh again and you should see success in green.


- Check your Slack channel for the message.

Conclusion
At this point, you should have a working Cloud to Cloud integration between Service Now and Slack with an automated Flow Instance that works off new Incidents in Service Now to kick off the Flow logic. This works by executing the Flow based on the Event Trigger that is triggered every time the Event Poll on the Service Now Connector Instance sees a new Incident Event. This Flow then POSTs an alert to Slack to notify a resource that there is a new Incident they need to explore in real-time.
The Flow Template is completely reusable. Just create a new Flow Instance, where you can modify the Slack or Service Now instances you are connected to or the Slack Channel.
What Now?
From here there are many ways you could use this base demo.
- You might update the message body sent to Slack with more details on the incident, such as the Severity or Urgency to encourage quicker response.
- You might change out Slack for your enterprise messaging system, such as by building an MS Teams connector.
- You might use the Service Now Incident Event Poller to kick off processes or feed alerts into your own internal apps.
The possibilities are endless!
Enjoy this blog post? Follow me on the Axway devblog. Stay tuned, enjoy, and reach out if you have questions or concerns with this configuration! Want to know more about the Axway Integration Builder and the art of the possible?
Let us know by visiting our site and clicking the “CONTACT” tab in red on the right.
Follow us on social