Background
Mobile phone two-factor authentication is the identification of a user by means of the combination of two different components, namely the user’s login credentials (username and password) and a code sent to the user’s mobile phone via SMS. Appcelerator Arrow makes it very easy to add two-factor authentication to your mobile apps. This post will demonstrate one way to use Arrow and an SMS service, like Twilio or EZ Texting, to create a set of REST API’s that you can use in your mobile apps to implement two-factor authentication.
The basic idea is as follows:
- The client app sends credentials (username & password) to Arrow
- Arrow verifies the credentials with the user authentication system (AD, LDAP, …)
- If the credentials are correct, Arrow creates an authentication code (e.g. 4 digit #) and stores this with the user record and sends a success reply to the client app
- Arrow sends this same authentication code to the SMS system along with the user’s cell phone number that is stored with the user record
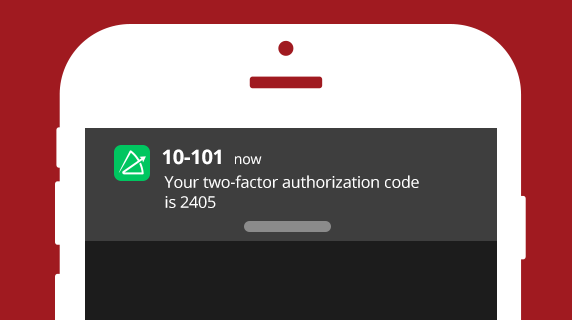
- The SMS system sends the authentication code to the user’s cell phone via a text message
- After receiving the authentication code, the user enters this code in the client app, which then will send the code to Arrow
- Arrow verifies the authentication code against the authentication code stored in the user record
This flow is illustrated in the diagram below: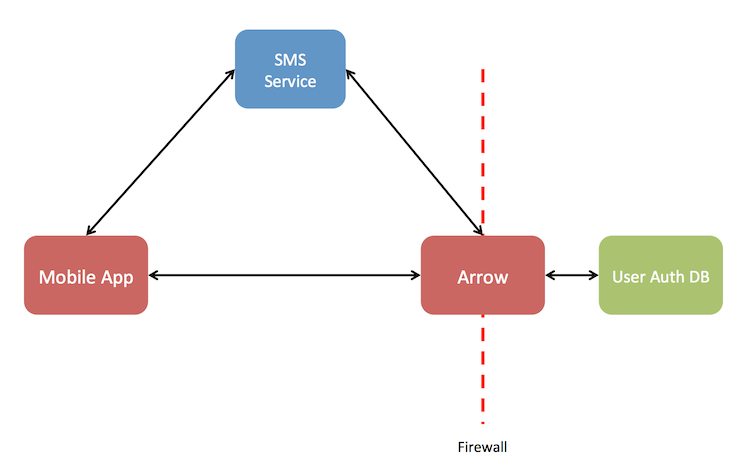
This post will focus on the Arrow implementation but a sample client app interaction is shown in the screen shots below: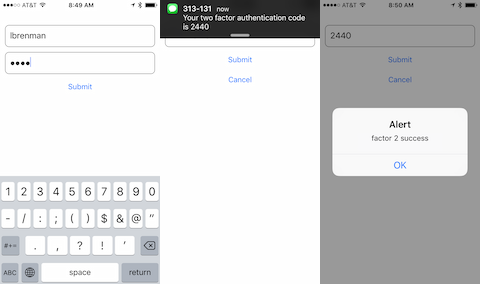
As described above, this two-factor authentication scheme requires the following:
- Arrow can access the authentication system to validate a user’s credentials
- The user records in the authentication system contain the user’s cell phone as well as a field to store the authentication code
If the authentication system does not contain a cell phone field and/or a field to store the authentication code, then Arrow can come to the rescue. ArrowDB database as a service can be used to store this info along with a foreign key that links the user record in the authentication system.
In this blog post, I will use ArrowDB to implement the entire user authentication database.
It is worth noting that ArrowDB contains an Email service that can also be leveraged as an alternate or complementary method for the second factor to send the auth code in an email to the user. This blog post will not cover this use case.
Let’s get started.
User database
The following Arrow Model, MyUser, will be used as the authentication system to authenticate user credentials:
var Arrow = require("arrow");
var Model = Arrow.createModel("MyUser",{
    "fields": {
        "username": {
            "type": "String",
            "required": true
        },
        "password": {
            "type": "String",
            "required": true
        },
        "cellphone": {
            "type": "String",
            "required": true
        },
        "authCode": {
            "type": "String",
            "default": null
        },
        "authCodeTimeStart": {
            "type": "Date",
            "default": null
        }
    },
    "connector": "appc.arrowdb",
    "actions": [
        "create",
        "read",
        "update",
        "delete",
        "deleteAll"
    ],
    "singular": "MyUser",
    "plural": "MyUsers"
});
module.exports = Model;
The field authCode will be used to store the 4 digit authentication code that Arrow will generate and will be sent to the mobile device via SMS. The field authCodeTimeStart will be used to store the timestamp for when the authentication code was generated. This will be used to verify that the client app sends the code to Arrow within a specified time period. This is optional but customary.
Factor 1
We will create a custom API, authf1, which will be called by the client app. The authf1 API shown below is implemented as a POST and the body should contain the username and password.
var Arrow = require(‘arrow’);
var request = require(‘request’);
// Twilio Account Details
var accountSid = ‘’;
var authToken = ‘’;
var fromNum = “+16179967979”;
var client = require(‘twilio’)(accountSid, authToken);
var Authf1 = Arrow.API.extend({
    group: ‘auth’,
    path: ‘/api/authf1’,
    method: ‘POST’,
    description: ‘2-factor authentication - first factor - username and password’,
    parameters: {
        username: {description:’Username’},
        password: {description:’Password’}
    },
    action: function (req, resp, next) {
        if(req.method===”POST”) {
            var model = Arrow.getModel(“MyUser”);
            model.query({username: req.params.username, password: req.params.password}, function(err, data){
            if(err) {
                    resp.response.status(500);
                    resp.send({“error”: “error accessing user database”});
                    next(false);
            } else {
                    if(data.length <= 0 || data.length > 1) {
                        resp.response.status(500);
                        resp.send({“error”: “username/password error”});
                        next(false);
                    } else {
                        data[0].authCode = Math.random().toString(10).substring(2,6); //random 4 digit #
                        data[0].authCodeTimeStart = new Date();
                        data[0].update();
                    // Send SMS authcode using Twilio service - https://www.twilio.com
                    client.messages.create({
                        to: data[0].cellphone,
                        from: fromNum,
                        body: "Your two factor authentication code is "+data[0].authCode
                    }, function(err, message) {
                            if(err){
                                resp.response.status(500);
                                resp.send({"error": "error accessing sms system"});
                                next(false);
                            } else {
                                resp.response.status(200);
                                resp.send({"status": "success"});
                                next();
                            }
                    });
                }
        }
    })
    } else {
        resp.response.status(500);
        resp.send({"error": "only POST supported"});
        next(false);
    }
}
});
module.exports = Authf1;
In the code above, Arrow performs the following:
- Use the username and password to query the MyUSer database
- If the user is found, then the credentials were correct
- Update the user record with a 4 digit authentication code (and timestamp)
- Send the user’s cell phone number and the authentication code to the SMS service provider
The example above is showing Twilio as the SMS service provider. The code here shows the EZ Texting code as well.
Factor 2
If the first factor was successful, then the user record has an authentication code (and timestamp) and the user’s mobile phone will receive an SMS with this same code.
We will create a second custom API, authf2, which will be used by the client app to send the username, password AND the authentication code to Arrow. Authf2 is shown below:
var Arrow = require('arrow');
var moment = require('moment');
var authTimeout = 120000; // 2 minutes to validate SMS Code

var Authf2 = Arrow.API.extend({
group: 'auth',
path: '/api/authf2',
method: 'POST',
description: '2-factor authentication - second factor - username and password and SMS Code',
parameters: {
username: {description:'Username'},
password: {description:'Password'},
authCode: {description:'SMS Code'}
},
action: function (req, resp, next) {
if(req.method==="POST") {
var model = Arrow.getModel("MyUser");
model.query({username: req.params.username, password: req.params.password}, function(err, data){
  if(err) {
resp.response.status(500);
resp.send({"error": "error accessing user database"});
next(false);
  } else {
if(data.length <= 0 || data.length > 1) {
resp.response.status(500);
resp.send({"error": "username/password error"});
next(false);
} else {
// Check authCode and time stamp
var now = new Date();
var difference = now - data[0].authCodeTimeStart;
if((req.params.authCode === data[0].authCode) && (difference < authTimeout)) {
resp.response.status(200);
resp.send({"status": "success"});
next();
} else {
resp.response.status(500);
resp.send({"error": "auth code or timeout error"});
next(false);
}
}
  }
  })
} else {
resp.response.status(500);
resp.send({"error": "only POST supported"});
next(false);
}
}
});
module.exports = Authf2;
In the code above, Arrow performs the following:
- Use the username and password to query the MyUSer database
- Compare the received authentication code with the one stored with the user record as well as make sure that the code was sent within the allotted time period (2 minutes in the above example)
Putting it all together
Let’s review the steps involved from the perspective of the client mobile app given the following MyUser account list:
Curl:
curl "https://<SUB_DOMAIN_TOKEN>.cloudapp-enterprise.appcelerator.com/api/myuser"Response:
{
    "success": true,
    "request-id": "ef2056f6-5d22-4d30-82aa-5ed1fd447f44",
    "key": "myusers",
    "myusers": [
        {
            "id": "564b30658861490910580d03",
            "username": "jdoe",
            "password": "1234",
            "cellphone": "6176428274"
        },
        {
            "id": "564b305c971a930908135b32",
            "username": "lbrenman",
            "password": "1234",
            "cellphone": "6176428274"
        }
    ]
}
(1) Present login screen, collect username and password and call the authf1 API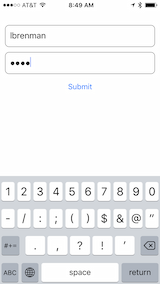
Curl:
curl -d 'username=lbrenman&password=1234' https://<SUB_DOMAIN_TOKEN>.cloudapp-enterprise.appcelerator.com/api/authf1Response:
{"status":"success"}(2) Based on the successful response, client mobile app presents the authentication code screen to allow the user to enter the SMS they will receive
(3) When the user receives the SMS, they enter the authentication code into the mobile app authentication code screen and call the authf2 API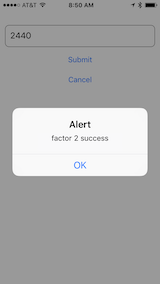
Curl:
curl -d 'username=lbrenman&password=1234&authCode=2440' https://<SUB_DOMAIN_TOKEN>.cloudapp-enterprise.appcelerator.com/api/authf2
Response:
{"status":"success"}(4) On Success, the client app can allow the user into the rest of the application since the user has been authenticated.
Summary
This post demonstrates how Arrow can easily be leveraged to implement two-factor user authentication for apps that require additional security by leveraging an SMS service provider such as Twilio or EZ Texting.
Code for this post can be found here.
Follow us on social