
We’ve had very many requests to add the ability to build Tweetie-like pull to refresh TableView functionality. This UI metaphor seems to have become very popular with many popular applications starting to adopt this design.
Starting in the upcoming 1.4 release, you’ll be able to do this. In this tutorial, I’m going to explain how to support this in your own application.
First, let’s create a simple tableview and a base window. I’m assuming you’re putting this in your app.js directly.
var win = Ti.UI.createWindow();

win.open();

var data = [

{title:"Row 1"},

{title:"Row 2"},

{title:"Row 3"}

];

var tableView = Ti.UI.createTableView({

data: data

});
Now, we’re going to create the header pull view. This view will be displayed when you go “above” the top of the table view.
We’re going to create a view with a nice blue background and a bottom border. Notice how I create a single line border at the bottom.
var border = Ti.UI.createView({

backgroundColor:"#576c89",

height:2,

bottom:0

})

var tableHeader = Ti.UI.createView({

backgroundColor:"#e2e7ed",

width:320,

height:60

});

// fake it til ya make it.. create a 2 pixel

// bottom border

tableHeader.add(border);
Now, we’re going to add the elements inside the header view for controlling the arrow and the labels.
var arrow = Ti.UI.createView({

backgroundImage:"../images/whiteArrow.png",

width:23,

height:60,

bottom:10,

left:20

});

var statusLabel = Ti.UI.createLabel({

text:"Pull to reload",

left:55,

width:200,

bottom:30,

height:"auto",

color:"#576c89",

textAlign:"center",

font:{fontSize:13,fontWeight:"bold"},

shadowColor:"#999",

shadowOffset:{x:0,y:1}

});

var lastUpdatedLabel = Ti.UI.createLabel({

text:"Last Updated: "+formatDate(),

left:55,

width:200,

bottom:15,

height:"auto",

color:"#576c89",

textAlign:"center",

font:{fontSize:12},

shadowColor:"#999",

shadowOffset:{x:0,y:1}

});

var actInd = Titanium.UI.createActivityIndicator({

left:20,

bottom:13,

width:30,

height:30

});
Notice we’re using a date utility function for formatting. You can paste this code to handle the formatting now:
function formatDate()

{

var d = new Date;

var datestr = d.getMonth()+'/'+d.getDate()+'/'+d.getFullYear();

if (date.getHours()>=12)

{

datestr+=' '+(d.getHours()==12 ?

d.getHours() : d.getHours()-12)+':'+

d.getMinutes()+' PM';

}

else

{

datestr+=' '+date.getHours()+':'+date.getMinutes()+' AM';

}

return datestr;

}
Now, the important part. We need to assign our header view to the tableview using the property headerPullView.
tableView.headerPullView = tableHeader;
This will tell the table view to use that special view when scrolling above the top of the table.
The next step is to handle our events to do the pull logic. Instead of building all this logic inside Titanium, we wanted to expose the lower-level events to you so you can build upon these capabilities to make more interesting applications from it.
There’s 2 new events: scroll and scrollEnd. You’ll receive the scroll event each time the user scrolls up and down. The scrollEnd event will be fired once scrolling stops.
Let’s add the code to handle the scrolling to determine when to show the message:
tableView.addEventListener('scroll',function(e)
{
var offset = e.contentOffset.y;
if (offset < = -65.0 && !pulling)
{
var t = Ti.UI.create2DMatrix();
t = t.rotate(-180);
pulling = true;
arrow.animate({transform:t,duration:180});
statusLabel.text = "Release to refresh...";
}
else if (pulling && offset > -65.0 && offset < 0)
{
pulling = false;
var t = Ti.UI.create2DMatrix();
arrow.animate({transform:t,duration:180});
statusLabel.text = "Pull down to refresh...";
}
});
tableView.addEventListener('scrollEnd',function(e)
{
if (pulling && !reloading && e.contentOffset.y < = -65.0)
{
reloading = true;
pulling = false;
arrow.hide();
actInd.show();
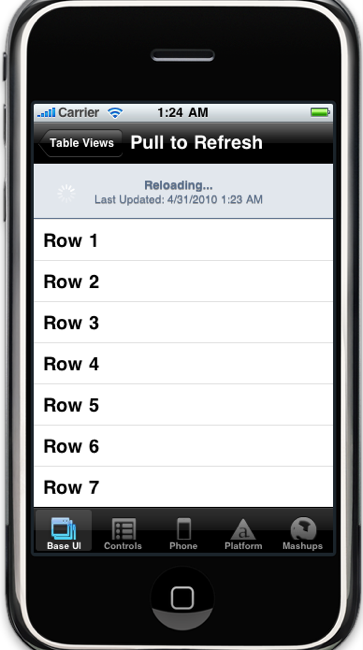
statusLabel.text = "Reloading...";
tableView.setContentInsets({top:60},{animated:true});
arrow.transform=Ti.UI.create2DMatrix();
beginReloading();
}
});
You’ll notice we’re calling the beginReloading. This function is where you’ll want to do your reload logic. In most cases, you’re going to use a web service call to fetch the data remotely.
In our example, we’re simply going to append new rows to the bottom. In a real application, you’re most likely going to call setData to reload the data (or if no changes, simply do nothing).
Also notice a fun method we’re using setContentInsets. This method will change the content position inset of the tableview. In this code, we’re simply lowering it by 60 pixels from the top. That ensures that 60 pixels of our header view remain visible while we’re reloading. In the endReloading will raise it with the following code
tableView.setContentInsets({top:0},{animated:true});.

var pulling = false;

var reloading = false;


function beginReloading()

{

// just mock out the reload

setTimeout(endReloading,2000);

}


function endReloading()

{

// simulate loading

for (var c=lastRow;c

{

tableView.appendRow({title:"Row "+c});

}

lastRow += 10;


// when you're done, just reset

tableView.setContentInsets({top:0},{animated:true});

reloading = false;

lastUpdatedLabel.text = "Last Updated: "+formatDate();

statusLabel.text = "Pull down to refresh...";

actInd.hide();

arrow.show();

}
We keep 2 state variables pulling and reloading that are used by the event handlers. The function beginReloading in our example simply sets a timer for 2 seconds to simulate a web service call. The endReloading code will then append some rows and then reset the header view and state.
So, one nice piece of code to point out is how to animate the arrow. We don’t need to use two arrows – we can simply use one arrow and animate it. In this case, we apply a simple rotation transform to rotate the arrow 180 degrees. To rotate it back, we can simply create an empty 2d matrix, called the identity matrix, and set it.
Now, a little video that demonstrates the entire demo. Note, this entire demo is now in Kitchen Sink under the Table Views section.
To view the full source of this tutorial, you can look at the Kitchen Sink version of the file here. Note: this code only works either on head or 1.4+.
Next tutorial, I’ll show you using the same event callbacks to create a continuously scrollable table view which can background fetch rows as you scroll towards the bottom.
Follow us on social