Guest poster, Michael Gangolf, has been using Titanium since 2010, been a Titan since 2017 and Android lover since the beginning. You can follow him at @michaelgangolf or on Github at https://github.com/m1ga
Following the color animation tutorial, this post shows how to create turntable animation with Titanium. Turntable animation is a 360° animation in one axis:
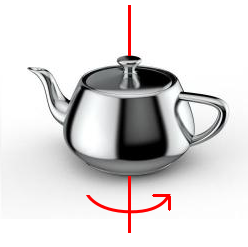
and is mostly used to show 3D objects from all sides. Since we cannot use a 3D engine, we will use a prerendered sprite sheet to create our animation. The sprite sheet contains all frames of the 360° animation and is stacked in a grid. The bigger you create the image, the higher the resolution will be; if you create more frames, you will have a smoother animation. In this example, we use a 8×8 grid with a 250x250px frame. So, the full image will be 2000x2000px.

The Alloy setup is rather easy – a View with the whole image and one View around it that displays only one frame:
index.xml
<Alloy>
 <Window>
 <View id="frameView">
 <View id="img"/>
 </View>
 </Window>
</Alloy>
index.tss
"#frameView" : {
    width: 250,
    height: 250,
    touchEnabled: false
}
"#img" : {
    width: 2000,
    height: 2000,
    backgroundImage: "/images/turntable.jpg",
    touchEnabled: false,
    top:0,
    left:0
}
The whole logic is inside the controller where we use touchStart/touchMove to cycle through the frames. To do this, we have disabled `touchEnabled` on the two views and add two event listeners to our index window:
function onStart(e) {
}

function onMove(e) {
}

$.index.addEventListener("touchstart", onStart);
$.index.addEventListener("touchmove", onMove);

$.index.open();
Inside onStart, we store the first x coordinate where the user clicks on the screen and calculate the distance to it every time touchmove is called:
var distX = 0;
var sX = 0;
var frame = 0;

function onStart(e) {
    // set start value
    sX = e.x;
}

function onMove(e) {
    // calculate distance between start and current x
    distX = (sX - e.x);
}

$.index.addEventListener("touchstart", onStart);
$.index.addEventListener("touchmove", onMove);

$.index.open();
If we move 5px, we will change a frame and set the start point the the new x coordinate. When we reach frame 64, we have to go to frame 0 again and visa versa so we have an endless loop.
function onMove(e) {
    // calculate distance between start and current x
    distX = (sX - e.x);

    // 5px buffer until we change a frame
    if (distX < -5) { frame--; sX = Math.floor(e.x); } else if (distX > 5) {
    frame++;
    sX = Math.floor(e.x);
    }

    // check frame
    if (frame >= 64) {
    frame = 0;
    } else if (frame < 0) {
    frame = 63;
    }
}
The last thing we need to do is calculate the top and left position of our frame. Frames 1 to 8 are at top=0 and left=0, 250, 500,…. Once we reach frame 9, we will start from left=0 again, but move top one row down (250px). In Javascript, we can do this simply with:
// frame to px
var x = Math.floor((frame * 250) % 2000);
var y = Math.floor((frame * 250) / 2000) * 250;

// change image
$.img.left = -x;
$.img.top = -y;
When you start your app and move your finger from one side to another, you will see a spinning object! The whole index.js looks like this:
var distX = 0;
var sX = 0;
var frame = 0;

function onStart(e) {
    // set start value
    sX = e.x;
}

function onMove(e) {
    // calculate distance between start and current x
    distX = (sX - e.x);

    // 5px buffer until we change a frame
    if (distX < -5) { frame--; sX = Math.floor(e.x); } else if (distX > 5) {
    frame++;
    sX = Math.floor(e.x);
    }

    // check frame
    if (frame >= 64) {
    frame = 0;
    } else if (frame < 0) {
    frame = 63;
    }

    // frame to px
    var x = Math.floor((frame * 250) % 2000);
    var y = Math.floor((frame * 250) / 2000) * 250;

    // change image
    $.img.left = -x;
    $.img.top = -y;
}

$.index.addEventListener("touchstart", onStart);
$.index.addEventListener("touchmove", onMove);

$.index.open();
and you can find the full project at: https://github.com/m1ga/appcelerator_turntable_animation

Follow us on social