Most Appcelerator developers work on Macs. Which makes sense for cross-platform developers, since you can develop for Android on both Mac OS and Windows, but for iOS you’ll need Xcode which is only available for Mac OS.
Unfortunately, development for Windows requires Visual Studio which is only available for Windows. So, to now cover all three platforms you can no longer rely on Mac OS alone:
| iOS | Android | Windows | |
|---|---|---|---|
| Mac OS | ? | ? | ? |
| Windows | ? | ? | ? |
So, here are your options:
| Simultaneous Use | Speed | Sharing Code | |
|---|---|---|---|
| Use two machines | ? | ? | ? |
| Run Windows in a VM | ? | ? | ? |
| Run Windows via Boot Camp | ? | ? | ? |
This week I ran a TwitterPoll on this topic and most of you plan on using an (additional) PC or Mac + VM: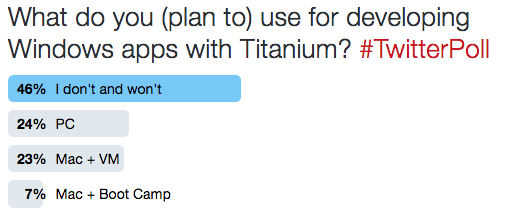
I’ve tried a VM but even on a 2.8 GHz i7 MacBook Pro with 16 GB memory I found it to be too slow to my taste. So, I decided to try Boot Camp. In this post I’ll discuss some Tips & Tricks from my experience so far.
I’d love to hear yours as well as I’m still not fully satisfied with my environment. I might still buy a Windows machine. ?
Installing Windows via Boot Camp
Follow Apple’s guide to Use Windows 10 on your Mac with Boot Camp, but pay attention to:
- Have a Windows 10 Pro License Key ready.
- Have a 8 GB USB flash drive ready.
- Make sure you select the right edition and language to download the Windows 10 64-bit ISO for. Single Language didn’t work for my license key, which resulted in a frustrating No images are available message early in the install process.
- When Boot Camp is about to create the partition, increase its size from the default 32 GB to at least 75 GB to fit Visual Studio and all. You won’t be able to resize it later!

Installing Windows for Development
Once Windows is installed it’s time to set up for development. We yet have to fully update our Installing the Windows Phone SDK guide for Windows 10 development, but here’s the gist:
- The Boot Camp tools should install themselves.

- Download and run the Appcelerator Studio 32-bit Installer which should:
- Install Java JDK 1.7.
- Install Node.js 0.12.
- Install Git.
Or install these dependencies manually and get the Appcelerator or Titanium CLI from NPM. But I recommend to let our installer handle this.
- Open Studio and after some login and firewall dialogs it should prompt you to install the latest Titanium SDK GA.
- Once that is done it should open the Platform Configuration wizard where you select Windows.
- This simply opens the browser to download and install Visual Studio. Get Community as it is free and Visual Studio Code won’t do.
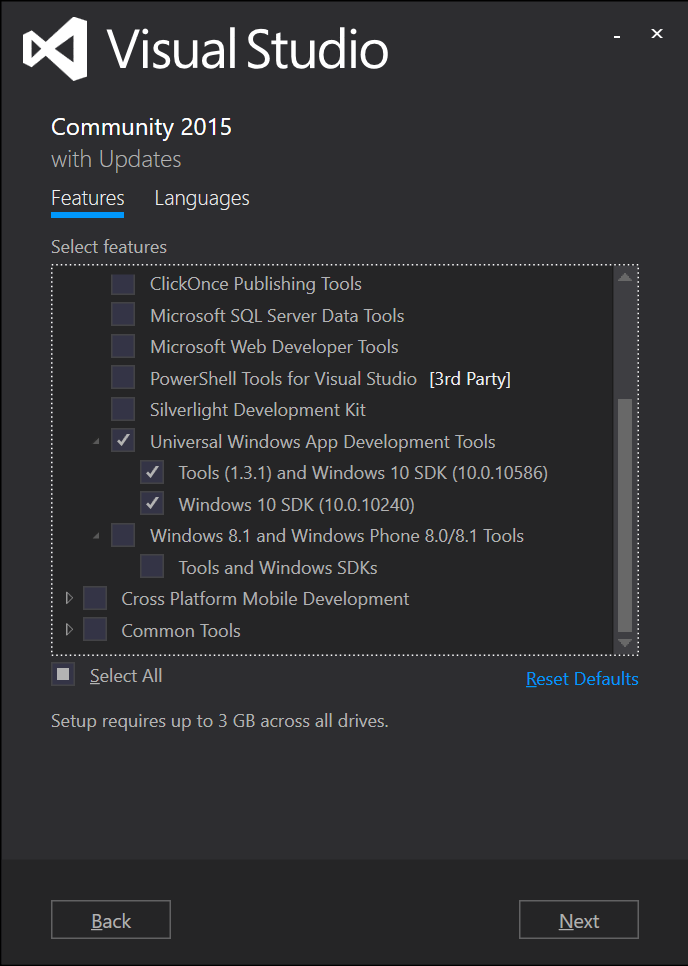
- Select the Custom installation type.
- Uncheck all optional features.
- Check the group for Universal Windows App Development Tools which will check any required dependencies automatically:
- If Titanium 5.3 is not GA yet by the time you read this, update Studio to 4.6.0 RC and the CLI and Titanium SDK to 5.3 RC.
- Make sure the Appcelerator Studio Dashboard displays Windows as Installed and try to build a simple Hello World.
Troubleshooting
These are some common issues I and others ran into:
No Windows Mobile Emulators listed in Appcelerator Studio
Open Visual Studio to check if they are listed there. If they’re not, then something is broken in Visual Studio. Uninstalling via Settings > System > Apps & features and then re-installing it should fix this. Repairing the existing install often does not.
Windows Mobile Emulators fail to start
Open Visual Studio and create a Windows Universal project. Try to build and run it in a Windows Mobile Emulator. Chances are you’ll see something like this: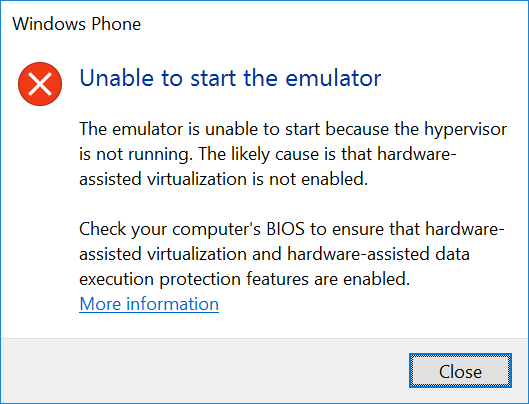
This can have two reasons:
- You don’t have Hyper-V installed.
- Hyper-V is not available.
To install Hyper-V go to Search > Turn Windows features on or off. If some of the checkboxes are disabled or if you already installed Hyper-V before then Hyper-V is currently not available. This happens when you (re)boot straight to Windows. Use the Boot Camp utility to reboot to OS X and then reboot to Windows. I know…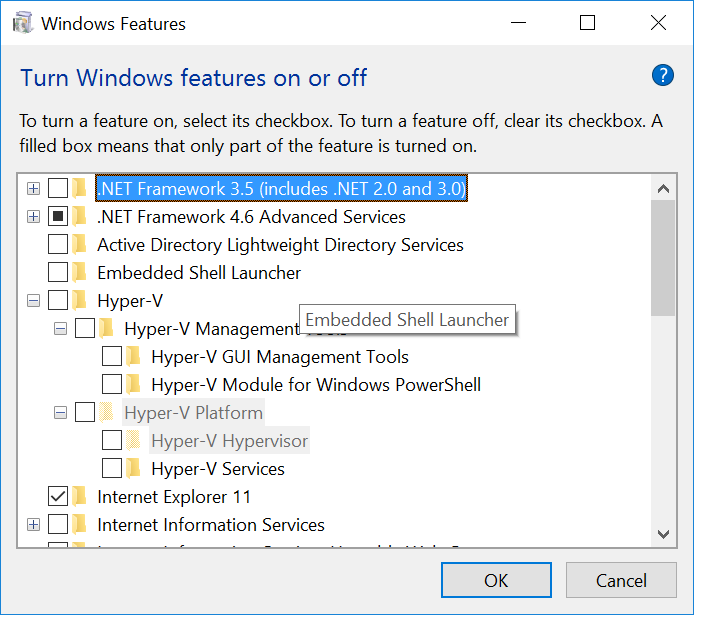
We’ve also seen cases where the Emulator VM somehow became unusable. In that case, go to Search > Hyper-V Manager and remove the VMs. Then often it’s a good idea to first start the emulators from Visual Studio. VS does some pairing magic which doesn’t always work from the CLI. Then once it works there, you should be able to use the emulator from Appcelerator Studio/CLI.
Appcelerator CLI can’t find Java
Even though building from Appcelerator Studio works fine, the CLI might complain it can’t find Java. This is because they currently use different ways to locate the JDK. For the CLI you need to set the JAVA_HOME environment variable set to %PROGRAMFILES%\Java\jdk<version> where <version> is whatever javac -version tells you. You can set it via Search > Edit the system environment variables.
Upgrading your Windows Phone to Windows 10
Of course you already own a Windows Phone, but perhaps it’s still running Windows 8.1 like mine was. Here’s how you do it
- Check if your phone is supported
- Install and the Upgrade Advisor app
Yes, that was painless!
Sharing files between Mac OS and Windows
To truly develop Titanium iOS, Android and Windows apps from a single code base you will need to find a way to actually share the code base between Mac OS and Windows. You can read but not write files from the other OS its partition. So you need a different solution:
- Use a shared exFAT formatted partition. Unfortunately Boot Camp won’t be able to configure your disk if it already has a such a partition. And if you create one from OS X after Boot Camp has configured the disk and you have installed Windows, it will break Boot Camp. The only option I’ve heard to work is to shrink the Boot Camp partition and then create another exFAT partition from Windows. This should get you a partition to store your projects on and access them from both OS X and Windows.
- Use a NAS, although the transfer speed would need to be really good to not have it slow down builds. To use a Time Capsule from Windows you need to have the Airport utility installed.
- Use an external exFAT formatted drive. If you use this as your Appcelerator Studio workspace you will need to have it mounted whenever you open Studio. Depending on the drive and connection builds might be slower.
- Use DropBox, OneDrive, Google Drive or whatever to sync files to both partitions via the cloud. The downside is that you will have all files on both partitions.
- Use git (why wouldn’t you?) and remember to commit and push before you switch OS. Again, this will take up space on both partitions.
- If you have a MacBook with a SD card slot you can buy a JetDrive Lite or similar. You can keep it mounted at all time without having something to carry around or stick out and it’s very fast and so will your builds.
For me the last one was gold!
Feeling at home in Windows as Mac user
Here’s some final tips to make you feel at home on Windows:
- Make sure you have selected a valid Apple Keyboard layout under Settings > Time & Language > Region & Language > (Language) > Options > Add a keyboard.
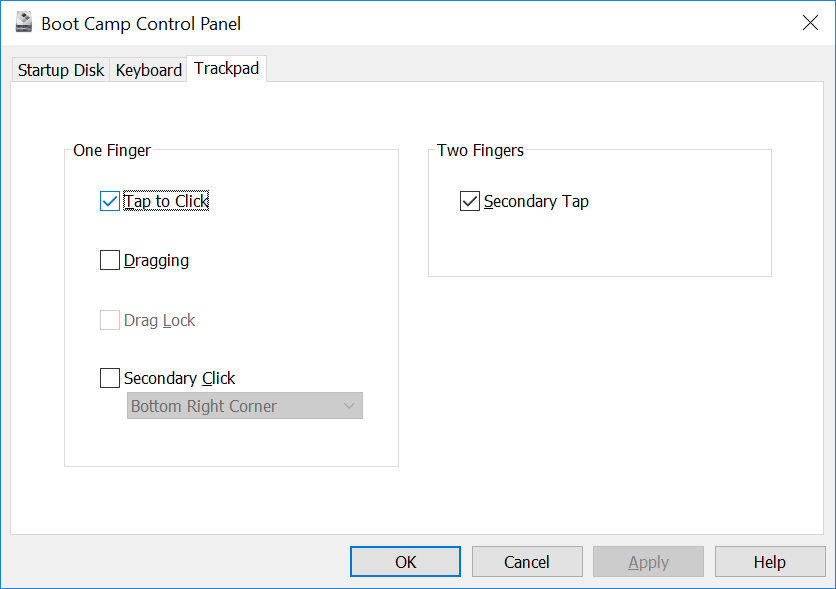
- You can use the Boot Camp-configuration screen to enable Tap on click for the Trackpad.
- You can reverse scrolling like Apple introduced in Lion using a AutoHotkey script which you’d set to automatically run at startup.
- To swap the Command (
⌘) and Control key so that you can use⌘ + Cfor copy etc add the following to the above script:LCtrl::LWin LWin::LCtrl - Print Apple’s Use your Apple Keyboard in Windows with Boot Camp guide to learn for common key combinations, including those to create screenshots.
- Let OneDrive automatically save them so you don’t need to paste and save in Paint.
- To turn off CRLF warnings for Git run
git config core.autocrlf true. - You can find the Titanium SDKs and core-modules under the (hidden) folder
C:\ProgramData\Titanium.
So far, I didn’t get the Bluetooth Magic Trackpad to work. I simply move my MacBook Pro a bit close so I can use its Trackpad while I work on my big screen and use the Bluetooth Apple Keyboard. If you know how to get it working, let me know! ?
Code Strong! ?
Follow us on social